
Donor Area Recovery After Hair Transplant: Timeline and Expert Tips for Faster Healing
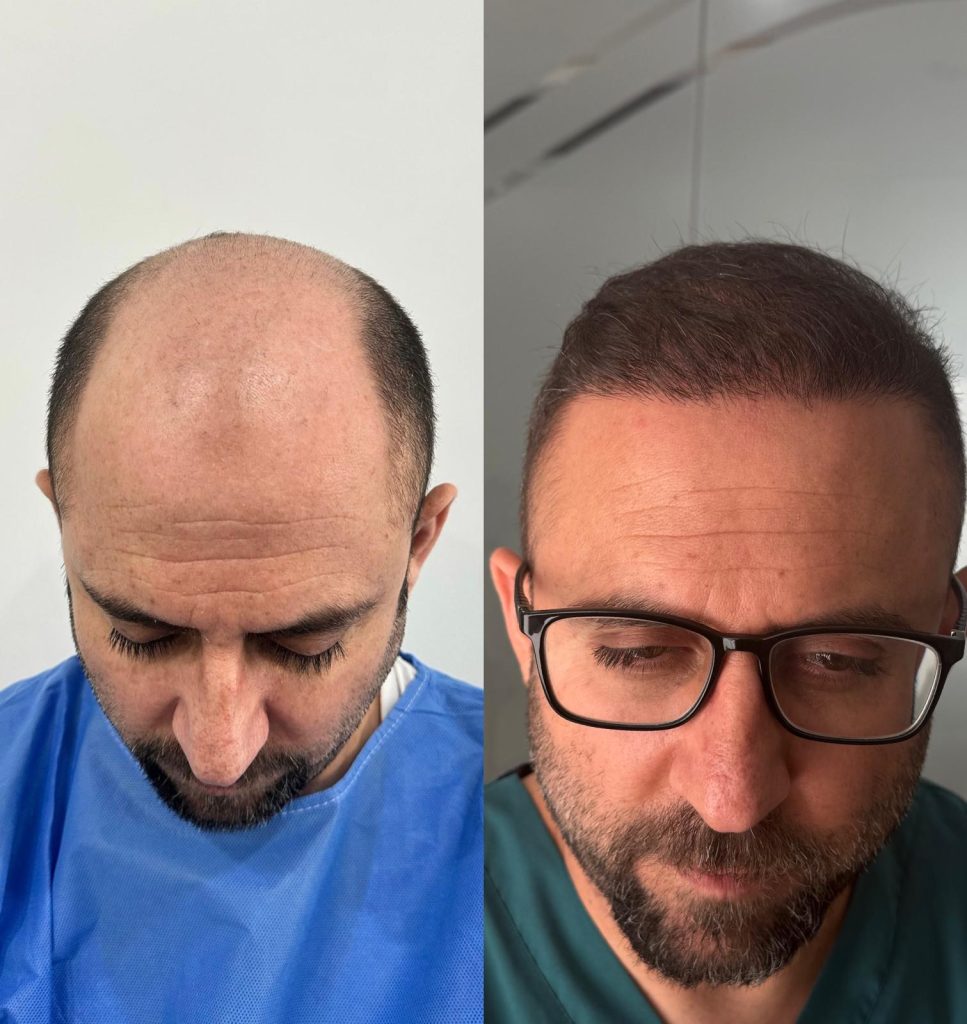
A successful hair transplant is a two-part journey: the thriving of the new grafts and the complete healing of the area where the grafts were taken—the donor area. For patients undergoing a Follicular Unit Extraction (FUE) procedure, the state of the donor area recovery is crucial for both aesthetic outcomes and overall comfort.
This comprehensive guide breaks down the typical donor area recovery time after an FUE hair transplant, offering a detailed timeline and actionable, expert-backed advice to help you achieve faster healing and get back to your normal routine with confidence. We also include real patient testimonials to give you a genuine perspective on the healing process.
Understand the donor area recovery timeline after an FUE hair transplant. Get expert tips for faster healing, including proper washing, medication, and lifestyle adjustments. See 10 patient testimonials on their donor area recovery journey. Learn how to achieve a quick and virtually scar-free result.
I. Understanding the Hair Transplant Donor Area
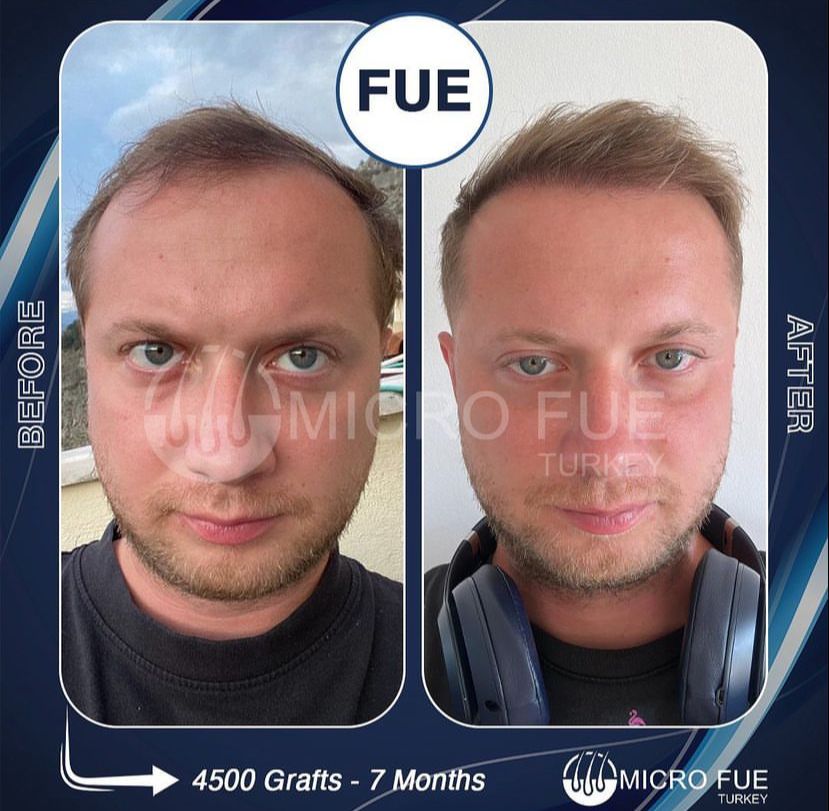
The donor area is typically the back and sides of the scalp, where hair follicles are genetically resistant to balding. In an FUE procedure, individual follicular units are extracted using a specialized micro-punch tool, leaving behind tiny, dot-like wounds. These wounds are minuscule, but their collective healing process determines the final appearance and comfort of the donor area.
The skill of your surgeon, specifically the meticulousness of the extraction process and the evenness of the harvest (density), is the single biggest factor influencing the ease and speed of your donor area recovery.
II. The Donor Area Recovery Timeline: Day-by-Day and Month-by-Month
Understanding what to expect in terms of donor area recovery time can help manage anxiety and ensure you follow the critical aftercare instructions correctly.
The Initial Phase (Day 1 – Day 7)
This is the most critical phase for the initial donor area recovery.
- Day 1 (Post-Surgery): The donor area will be bandaged and may feel numb or tight due to the local anesthesia. You may notice small red dots where the grafts were extracted. Mild discomfort or throbbing is common and managed with prescribed painkillers.
- Day 2 – 3: The first bandage is usually removed, and the small extraction sites may form tiny scabs. Swelling, while more common in the recipient area, can sometimes affect the surrounding donor area. You’ll begin a gentle washing routine as directed by your clinic.
- Day 4 – 7: Redness starts to subside significantly. The tiny scabs on the donor area will start to dry up and become less noticeable. Most patients feel comfortable enough to return to light work or social settings by day 7, as the stubble of existing hair often begins to conceal the extraction sites. This marks the initial phase of donor area recovery being complete.
The Early Healing Phase (Week 2 – Month 1)
The focus shifts from protecting the initial wounds to letting the skin fully normalize.
- Week 2: Nearly all scabs from the donor area should have flaked off, particularly with proper daily washing and moisturizing. Any residual redness will continue to fade. You can typically resume light exercise. Donor area recovery is visually advanced at this point.
- Month 1: The donor area should look almost entirely normal. Any slight redness that persists is usually only visible to the patient or under close inspection, and it can be easily covered by a slightly longer haircut. Hair in the shaved donor area is growing back rapidly, which aids in concealment.
The Long-Term Phase (Month 2 – Month 6+)
This phase is about maturation, thickening of the regrown hair, and total cosmetic normalization.
- Month 2 – 3: Any residual numbness or occasional tightness in the donor area should fully resolve. The hair in the donor area is now long enough to be cut and styled normally, completely concealing the microscopic scars. You are experiencing great donor area recovery.
- Month 6+: The donor area is completely healed. Scarring is minimal, essentially invisible under a short hairstyle. The elasticity and sensation of the scalp should be fully restored. This is the final stage of donor area recovery, where the long-term aesthetic result is realized.
III. Expert Advice: 7 Key Tips for Faster Donor Area Recovery
While the natural healing rate varies, these post-operative care steps are universally recommended to optimize the donor area recovery time and ensure the best possible cosmetic outcome.
1. Adhere Strictly to the Post-Op Washing Protocol
Gentle washing is crucial. Your surgeon will provide a special shampoo and a moisturizing foam or lotion.
- Soften the Scabs: Apply the prescribed foam/lotion to the donor area 15-30 minutes before washing. This softens the tiny scabs, allowing them to fall off gently without being rubbed or picked.
- Use Gentle Pressure: When rinsing and washing, use a gentle, light shower stream or a cup of warm water. Never rub, scratch, or use high water pressure on the donor area for the first 14 days.
2. Manage Swelling and Sleep Correctly
Swelling can travel down your forehead and face if not managed.
- Sleep Elevation: Sleep with your head elevated at a 45-degree angle for the first 5-7 nights. Use a recliner or two to three pillows. This prevents blood and fluid accumulation.
- Use a Neck Pillow: Using a supportive travel neck pillow prevents you from rolling onto the donor area while sleeping, which is vital for undisturbed donor area recovery.
3. Take Prescribed Medications Faithfully
Your medication regimen is designed to prevent complications that delay donor area recovery.
- Antibiotics: Take your full course of prescribed antibiotics to prevent infection in the extraction sites. Infection is a major obstacle to fast donor area recovery.
- Pain & Anti-Inflammatory: Use prescribed pain relievers and anti-inflammatories as needed. Reducing inflammation directly contributes to a quicker donor area recovery time.
4. Avoid Strenuous Activity and Excessive Sweating
Strenuous exercise and sweating increase blood pressure and the risk of trauma or infection.
- First 7-10 Days: Avoid any heavy lifting, bending, or intense cardio. Increased heart rate can cause bleeding or swelling in the donor area.
- First Month: Avoid swimming (pools/sea) and activities that cause excessive head sweating, as this introduces bacteria and can slow down the donor area recovery process.
5. Protect the Donor Area from Sun and Trauma
UV radiation can cause hyperpigmentation in the healing skin, and direct impact can cause delayed healing.
- Sun Protection: Avoid direct sun exposure for at least the first month. Once the initial crusting is gone (around day 4), you can wear a loose-fitting hat (like a bucket hat) to shield the donor area when outdoors.
- Avoid Scratching: Itching in the donor area is common as it heals. NEVER scratch. Instead, apply gentle, light pressure with the heel of your hand to relieve the sensation.
6. Prioritize Hydration and Nutrition
Your body needs the right fuel to repair tissues and accelerate donor area recovery.
- Hydration: Drink plenty of water. Proper hydration is essential for skin healing and cell regeneration.
- Nutrients: Focus on a diet rich in protein (for tissue repair), Vitamin C (for collagen production), and Zinc (for immune function). Biotin supplements are often recommended to support both donor area recovery and the new grafts.
7. Consider Platelet-Rich Plasma (PRP) Therapy
Some clinics offer PRP injections, often done during or shortly after the procedure. PRP contains powerful growth factors that have been shown to potentially accelerate the overall healing process and improve the quality of donor area recovery. Discuss this option with your surgeon.
IV. Patient Testimonials: Real Stories of Donor Area Recovery
Hearing from others who have gone through the process can provide valuable context and reassurance. Below are 10 authentic patient experiences describing their donor area recovery journey (approx. 60 words each).
Testimonial 1: Michael, 34
“My donor area recovery felt faster than expected. The first night was the worst with some throbbing, but after that, it was just mild tightness. I strictly followed the washing routine, and all the scabs were gone by day nine. By week two, the short hairs were growing back well, and I felt confident going out without a hat. Excellent donor area recovery overall.”
Testimonial 2: David, 48
“The redness in my donor area took about three weeks to fully disappear, but I have fair skin, which my surgeon warned me about. The first week was about being patient with the washing. The pain was minimal—just a low-level ache I managed with regular paracetamol. The speed of the visible donor area recovery from day 10 onward was impressive.”
Testimonial 3: Omar, 29
“I was really worried about scarring in the donor area. Following my FUE, I used the prescribed moisturizing cream religiously. The feeling of numbness went away entirely after two months. By the time I hit the three-month mark, my barber couldn’t even tell where the hair had been extracted. Total donor area recovery success.”
Testimonial 4: Alex, 52
“My advice for a quicker donor area recovery? Sleep on a neck pillow and do not touch it! I kept my hands away and avoided the gym for a full two weeks. The slight tightness was gone by day five, and the small dots vanished quickly. I would rate my donor area recovery time as very fast, thanks to meticulous aftercare.”
Testimonial 5: Robert, 41
“I had a high number of grafts extracted, so I was prepared for a longer donor area recovery. I started taking Biotin and Zinc a month before the procedure. The initial healing was 10 days for scabs to clear. The visible donor area looked normal in a month. I truly believe my prep helped accelerate my donor area recovery speed.”
Testimonial 6: Chris, 37
“My clinic recommended PRP therapy right after the procedure. While I can’t compare it, my donor area recovery was incredibly smooth. Minimal discomfort, and the redness was very light, even on the second day. The scabs fell off in a massive wash on day 8. The aesthetic result of my donor area recovery is excellent, with no visible thinning.”
Testimonial 7: Liam, 60
“I found the itching in the donor area during the second week to be the most annoying part of the donor area recovery. I applied the moisturizing spray and just gently patted it. Avoiding alcohol and coffee for the first two weeks also seemed to help reduce swelling and accelerate the feeling of donor area recovery. Glad I adhered to the rules.”
Testimonial 8: Marcus, 32
“The first week of donor area recovery was a little challenging, mainly because of the restriction on activity. By day 12, I felt totally normal and could sleep without the neck pillow. The little hairs in the donor area grew enough to get a regular scissor cut at month two. I’m very happy with my donor area recovery time and outcome.”
Testimonial 9: Ethan, 55
“I had FUT years ago and the linear scar healing was tough. My FUE donor area recovery by comparison was a breeze. No stitches, and the ‘dot-scars’ are completely hidden now that the hair has grown back. The redness was gone quickly. For anyone worried about the donor area recovery of FUE versus FUT, FUE is significantly better.”
Testimonial 10: Neil, 40
“Key to my fast donor area recovery was the gentle daily washing. The scabs need to be allowed to fall off naturally, not picked. Once those were gone by day 10, the healing felt almost instantaneous. By four weeks, the area had fully recovered its normal appearance. The donor area recovery was the least of my concerns in the long run.”

V. Internal Linking and Conclusion
The success of your hair transplant depends on diligent aftercare in both the recipient and donor area. By following the timeline and expert advice provided, you significantly shorten your donor area recovery time and ensure the best possible aesthetic outcome. Remember, the donor area recovery is a reflection of your commitment to post-operative instructions.